


 Title Index
 Recently Changed
 Page Hierarchy
 Incomplete
 Tags
Tags


DiaMed 2.0 is published using different installer technology and product codes. For this reason, the upgrade from 1.X to 2.0 requires an uninstall of the original installation and an install of the new client. The steps required to complete this process are outlined below.
Step 1 - Recording the Connection Information
(Only complete this step on a single workstation.)
1. Go to Start_Run, type notepad and click OK
2. Once notepad opens, click File_Open
3. In the open file dialog, browse to the DiaMed installation directory.
(Usually C:\Program Files\Chiron Data Systems\DiaMed)
4. Select Files of Type combo to "All Files"
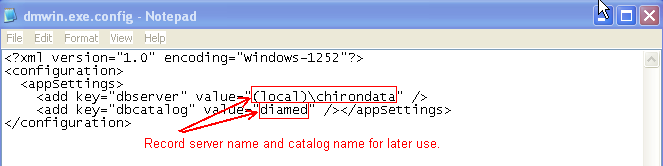
5. Select the file dmwin.exe.config and click Open.
6. Record the server name and catalog name from the file for
use later with the install of the new client.
Step 2 - Uninstall DiaMed 1.X
(Repeat this step on all workstations with the DiaMed client.)
1. Go to Control Panel_Add/Remove Programs
2. Select DiaMed and click Remove **
3. Follow instructions as necessary to remove the DiaMed client.
**Do not remove DiaMed Database Install if that application is found
on the workstation Add/Remove Programs. This program indicates
the workstation is acting as a server.
Step 3 - Install DiaMed 2.x Client
(Repeat this step on all workstations with the DiaMed client.)
1. Follow Install Steps found at
Install DiaMed Client Application
2. Use the server name, database (catalog) name information retrieved
in Step 1.6 to complete step j of the 2.0 install.